Category Archives: VPN

VPN Not Working with Netflix? Here’s How to Fix It

Have you used a VPN with Netflix then encountered an error page you weren’t expecting?

You’re not alone. Netflix wants their customers see content intended for their region only. And they’re well aware that plenty of users want to bypass that restriction.

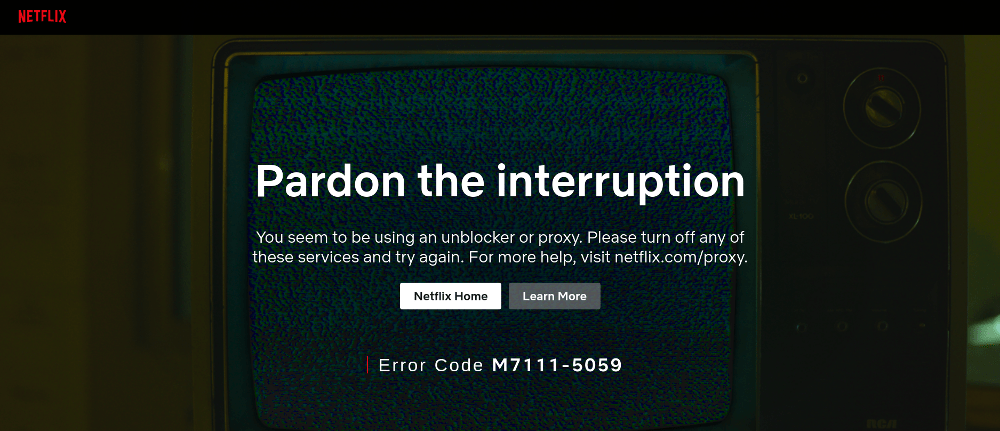
If you reached an unplanned popcorn break, odds are this is the page that appeared:

So, is this the end of the road for using VPNs with Netflix?

Not at all! Although Netflix has made it harder to use a VPN to view content outside your region, it still works if you’re using an IP that hasn’t been identified as a VPN.

Quick reminder: To achieve anonymity VPNs replace your true IP address with an IP associated with the VPN service. So, for example If you select a US location with the VPN software it will mask your actual location and assign you with an IP address in the US that they own.

Now that everyone knows how it basically works, let’s look at how you can solve this issue.

How to Get Past the Netflix Streaming Error Page

1. Try a different server

If your VPN allows you to select a different IP located in the country you desire, try that.

It’s possible the IP you’re accustomed to using has been blocked by Netflix, but other IPs that can be selected with your VPN software work fine.

Of course, if you don’t have the option to select a different IP address directly, you’ll want to move to the next troubleshooting suggestions below.

2. Change the VPN protocol

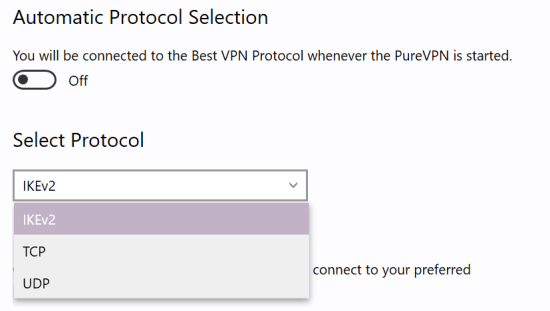
Surprising as it may sound, sometimes you can work around the problem simply by switching to a different protocol with your VPN software.

There are a number of protocols in existence, however the ones you can utilize will vary depending on your VPN provider.

The most common VPN protocols are:

  • PPTP
  • L2TP/IPSec
  • OpenVPN
  • SSTP
  • IKEv2

Speed and the level of security is different with each protocol, and they all have their pros and cons.

The only one you should think twice about using is PPTP as this is the oldest protocol. The speed is decent but its security leaves much to be desired compared to the other options listed.

Of course, changing the VPN protocol is only a temporary measure if you’re forced to choose a protocol that doesn’t meet your standards. But in most cases, you won’t notice much of a difference.

3. Switch to another VPN

Not all VPNs are good choices for use with Netflix.

If you keep having to jump through hoops to get streaming to work, it could be time to look at alternative solutions.

Some VPN providers are focused on keeping their service working smoothly with Netflix, while its not on the radar for others.

Also, which service works and which doesn’t can change quickly. Some power users are signed up to more than one VPN service to improve their chances of having a solution at their fingertips.

Before switching, do your research to ensure other users are using Netflix without issues. There’s a Reddit group called NetflixViaVPN dedicated to the topic of using Netflix with a VPN. It’s helpful for finding the latest information.

Also, check out LetMeBy’s reviews of the top 3 VPN services as these are the best performers all-around.

How Does Netflix Know You’re Using a VPN?

Streaming services like Hulu, Amazon Prime Video, and Netflix all have systems put in place that aim to detect if you’re using a VPN.

If your IP matches the IPs in their database that they’ve identified as VPNs you’ll get the streaming error page.

The good news is the best VPN services are always adding fresh IPs for their users to select as well as finding ways to allow their customers to keep using the services they love (such as Netflix).

Will Netflix Ban You for Using a VPN?

Although Netflix wants you to use their services as they intended, they don’t want lose you as a customer either.

Internet privacy aficionados have been using VPNs with Netflix for years and there are no reports about even receiving warnings from Netflix for this.

Thus, your Netflix account is safe.

Conclusion

Using a VPN with Netflix can be frustrating at times, but having access to content from different regions is a real game changer for film and TV buffs.

If you come across the dreaded Netflix streaming error page, don’t fret as there’s always a way around it. And if it’s just a question of changing your IP address, or your VPN protocol, consider it a good day.

How to Hide Your IP on Xbox One & Series X/S

xbox-one-settings

There are plenty of reasons why it’s better to protect your real IP by using a VPN with Xbox Live.

First, there are unscrupulous players that use DDOS attacks in games like Call of Duty to retaliate and get their rivals temporarily disconnected from online play.

Second, you’ll be able to take advantage of services available outside your country, such as the U.S. version of Netflix if you live in Canada, for example. Lastly, since games are released in different time zones or on different dates in other countries, you may be able to access new games sooner than your neighbors.

Unlike the PS5, you cannot set up a VPN server directly in Xbox system software. Instead you’ll need to share your computer’s VPN with your Xbox or centralize your VPN tunnel with a router so your home computer, devices, and Xbox all pass through it.

Whether you have an Xbox Series X/S, Xbox One, or Xbox 360, the process is the same. That being said, let’s get to the nuts and bolts of hiding your IP address on Xbox.

First Method: Connecting to a VPN Through a Router

If you’re permitted to make changes to your entire home network, this is a straightforward way to change your IP.

Note that you’ll need a VPN to complete this tutorial. If you don’t have one, go to LetMeBy’s top-rated VPNs.

Step 1

You’ll need to use an Ethernet cable to connect your modem to your router using the WAN port.

Step 2

Next, open the router’s control panel. This is usually accessible via a Web browser. Enter the IP address associated with your router in the address bar of the browser. If you don’t know how to find the right IP, follow this tutorial for Windows.

The next steps will vary depending on the manufacturer/model of your router and the VPN company.

Step 3

Click on the ‘Basic Setup’ / ‘Network’ / ‘Basic’ tab in your router control panel or wherever you can find the options relating to WAN configuration or Internet connection.

Step 4

Enter the information provided by the VPN provider (username, password, gateway, subnet mask, etc.).

Step 5

Choose the protocol recommended by the VPN provider to work with their services (ex. PPTP w/ DD-WRT, OpenVPN w/ DD-WRT).

Step 6

Adjust the DCHP settings depending on the requirements of the VPN service.

Step 7

Click ‘Save’ / ‘Apply Settings’ / ‘Connect’ and you’re finished!

Second Method: Using a PC for VPN Setup

Another option is to use your Windows-based PC to share the VPN connection with your Xbox. This is divided into two parts: 1) Windows settings and 2) Xbox settings.

Windows Settings: Setting up the VPN

Step 1

In Windows, go to ‘Control Panel’ > ‘Network and Sharing Center’

Step 2

After you click on ‘Setup a New Connection or Network,’ a wizard will appear in a new window.

Step 3

Select ‘Connect to a Workplace’ then click ‘Next.’

Step 4

When the wizard asks you how you’d like to connect, choose ‘Use my Internet Connection (VPN).’

Step 5

Enter the Internet Address and Destination Name given to you by the VPN provider. After you’ve finished filling in the details, click on ‘Next.’

Step 6

Finally, enter the Username and Password provided by the VPN service and click ‘Connect’.

Now that you’ve completed the settings on the PC side, you’re ready to fire up your Xbox Series X/S, Xbox One, or 360 and proceed with the next part.

Xbox Settings: Connecting to the VPN

Step 1

Press the ‘Xbox’ or ‘LIVE’ button on your Xbox controller.

Step 2

Go to the ‘Settings’ tab and choose ‘System Settings.’

Step 3

Now that you’re in the ‘System Settings’ menu, you can select ‘Network Settings.’

Step 4

Xbox Series X/S, Xbox One, or 360 will now automatically detect the Wi-Fi connections that are available. Choose the appropriate network from the list.

Step 5

Now, enter the WPA key. It can be found printed on sticker on the underside of your router.

Step 6

Finally, the Xbox system software will prompt you to ‘Test Connection.’ Do this to ensure you’re ready to use the VPN with your favorite games!

Recommended services:

How to Hide Your IP Address on PS4 & PS5

xmb-settings

There are numerous benefits to using a VPN to change the IP on your Playstation.

You can do it to access Netflix movies available in a country outside your own, reduce lag when gaming online, access games available in different countries, or protect yourself from DDOS attacks.

An easy, effective way to hide your IP address is to use the Internet Connection functions built right into your console’s operating system.

It’s done in a pretty similar fashion on PS4 and PS5, although it has been streamlined on the PS5. Instructions for both are provided separately below.

Hide your IP on PS5:

Step 1

From your PS5’s main menu, go to ‘Settings.’ Look for the icon looks like a cog.

Step 2

Select ‘Network,’ choose ‘Settings,’ then go to ‘Set up Internet Connection.’

Step 3

Choose your existing internet connection. If you haven’t set up your home network, proceed with that now.

Step 4

Select ‘Advanced Settings,’ then go to ‘DNS Settings.’ Finally, choose ‘Manual.’

Step 5

Enter the primary and secondary DNS provided to you by your VPN service provider.

That’s it!

Note that you need a VPN to complete the final step and successfully hide your IP. LetMeBy’s top-rated VPNs are listed below.

Recommended services:

Hide your IP on PS4:

Step 1

From the main menu in XMB, go to ‘Settings.’

Step 2

Move down through the options and select ‘Network.’

Step 3

From the Network screen, select the first option, ‘Connect to the Internet.’

Step 4

XMB will now ask if you’re using a Wi-Fi or LAN connection to access the Internet with your PS4. Select whichever one is appropriate for your situation.

Step 5

XMB will ask how you want to set up your Internet connection. Choose ‘Custom.’

Step 6 (Wi-Fi only)

If you’re using a Wi-Fi connection you’ll have to select the name of the network from the next menu.

Once that is done, enter the password for that network.

Step 7

It will ask for your DHCP Host Name. Select ‘Do Not Specify.’

Step 8

For DNS Settings, choose ‘Automatic.’

Step 9

For your MTU Settings, do the same and select ‘Automatic.’

Step 10

Now we’ve reached the important part! For the Proxy Server, choose ‘Use.’

Step 11

Enter the IP Address of your VPN server as well as the Port Number below that.

If you don’t have one or know what this is, go to LetMeBy’s top-rated VPNs.

Step 12

Now that you’ve entered the specific info for your VPN, XMB ask you to save your setting on the next screen.

Next, you’ll be prompted to test your Internet connection. Now you’ll be certain if the VPN is up and working properly.

And that’s a wrap!

How to Unblock Telegram Securely

Telegram is a growing instant messaging app, but not every country is feeling the love.

It’s banned in Iran, China, India, and Pakistan. It was also previously blocked in Russia before the restriction was lifted in 2020.

Why Telegram Was Blocked

After Edward Snowden alleged the NSA was spying on Americans, the public’s perception of institutions would never be the same.

With distrust of institutions and tech giants at an all-time-high, many people began to look into alternative apps like Telegram. They started using the app because they were concerned that they were being surveilled.

In fact, Telegram was born out of distrust for governments, server authorities, and the big players in social media.

When governments found out about the type of users Telegram was attracting, some clearly weren’t impressed.

Several countries labeled it as a political tool or as a threat to national security. Iran and Russia have specified that the Islamic State used it to organize terrorism plots, spread propaganda, and communicate with foreign governments.

How to Unblock Telegram

Do you live in a country that has blocked Telegram? Did you try to use the app at school or work only to find it’s blocked by the administrator?

The easiest, most reliable way to unblock Telegram is to use a VPN. A virtual private server allows you to hide your current location and replace it with another location of your choice. For example, people in Iran can change their IP address to one that is associated with the United States. Thus, you’ll be able to bypass the restriction and access the app.

There are a lot of solid VPN services out there, plus they’re all more affordable than ever. At LetMeBy we aim to only recommend the best to our visitors.

These are our go-to fast, secure VPNs:

Telegram’s Privacy and Security: Strong Enough?

According to the software developer themselves Telegram messages are always securely encrypted. Secret Chat messages use client-client encryption. Cloud Chats use client-server/server-client encryption and data is safely stored in the Telegram Cloud.

Critics have noted that while Telegram messages are encrypted, the method used to achieve this is suspect. It uses closed source encryption which is considered inferior by many leading security experts.

Additionally, Telegram messages are not encrypted by default. You have to enable this feature. Founder Pavel Durov wrote about why it’s a myth that messengers like WhatsApp are better because they use “end-to-end encrypted by default”, while Telegram does not.

Tensions Lead to Durov’s Creation

Telegram founder Pavel Durov, was once dubbed “Russia’s Mark Zuckerberg” for creating a widely used website similar to Facebook for Russian citizens.

He fled Russia with $300 million due to clashes with Putin’s government. It was during this time in self-exile that Durov started programming Telegram. He created it specifically to give users better privacy and security when messaging.

The Yarovaya law, which requires Russian telecom operators to keep all voice and messaging traffic of their customers for half a year went into effect in July of 2018.

Management at Telegram couldn’t comply with the new law. They stated it was technically impracticable to provide transcripts of secret chats since they weren’t stored on the user’s devices or on Telegram’s servers.

Consequently, later in 2018 the Russian government began blocking Telegram. The ban was lifted in 2020 after Telegram agreed to help with extremism investigations.

Conclusion

Many users swear by Telegram and think it’s much safer-to-use than competitors like Facebook Messenger. Ultimately this camp prefers to trust Telegram founders Nikolai and Pavel Durov than to trust Mark Zuckerberg of Facebook.

Others have pointed out that Telegram’s closed source encryption method is not as strong as their competitors. So, if you’re a fan of the app but want to be extra safe you may want to enable a VPN to add an additional layer of encryption.

You Can Hide Your IP on Steam… But Is It Safe?

There are many reasons to desire greater anonymity when playing your favorite games on Steam. You may want to hide your personal info from malicious gamers, hackers, or conceal your activity from your ISP (Internet Service Provider).

The issue is that hiding your IP on Steam can be done for both valid and rule-breaking purposes. So, it’s best to proceed with caution and read their updated terms of services. In short, there are actions you can take while your IP is hidden that are fine, while other actions can violate their terms.

For example, changing your location with a VPN service to get access to pricing and deals only available in other countries is not allowed.

Why Use a VPN with Steam?

These are the reasons to use a VPN, whether there are risks or not:

  1. To experience greater privacy in-game and with Steam’s social features
  2. To get access to better deals via another countries’ store
  3. Block geo-restrictions on gaming content

Safe to Use a VPN with Caveats

A Reddit user asked Steam support if it’s okay to use a VPN with Steam in general. It turns out it’s fine, but you have to remain very conscious of what you do while it’s on.

Here’s their official answer:

Hello,

Playing games or operating Steam while using a VPN is not strictly prohibited.

However, it may affect gameplay and the Steam client itself.

A Steam account will only be restricted for actions that violate the Steam Subscriber Agreement or Steam Online Conduct Rules, so please keep in mind that purchasing games while your VPN is active is a violation of our Terms of Service.

If you have any further questions, please let us know – we will be happy to assist you.

Changing Your Geographic Location on Steam

If you’ve examined the risks and still want to change your country on Steam to access a different country’s store, here’s how you do it.

  1. Enable your VPN from a trusted provider.
  2. After launching the Steam app and logging in, click on your avatar or profile name.
  3. Select ‘Account Details’ from the dropdown menu.
  4. Click the link that reads “Update Store Country.”
  5. Confirm that you want to change your country, then enter a new mailing address. The new address should match the billing address for the payment method you’re using. You don’t need to worry about your billing address being the same if you use Steam Wallet or a gift card.

Warning: Changing your address too frequently can put your account in a temporary cooldown period. This will prevent you from changing your country again until the period ends.

Conclusion

If you use choose to use a VPN with Steam, it’s vital to carefully consider how it affects all your actions on the platform.

Using a VPN to circumvent Valve’s rules and policies is risky. As is forgetfulness, as you’ll need to take special note of whether your VPN is enabled or not when accessing content or making purchases.

If protecting your privacy is the goal, it should be worth the few extra steps and precautions.