Category Archives: Windows

Clever Hacks to Get YouTube TV in Canada

YouTube TV launched in the U.S. in 2017. There’s been speculation that they would expand outside of the U.S. and offer their streaming service to Canadians along with others like Hulu. However, YouTube TV hasn’t made an official announcement about this.

So, Canadians that are tired of hoping and waiting may want to grab the bull by the horns. Yes, you can get access to YouTube TV in Canada today! All you need to do is jump through some hoops before signing up and follow the tech savvy steps in this guide.

Is It Worth the Effort?

Netflix, Amazon Prime Video and CBS All Access are available in Canada. Thus, one might wonder if getting YouTube TV in Canada is really worth it.

For those who want a comprehensive replacement for cable TV, it is. This a great opportunity to get sports, news, and special interest programming you don’t have access to on Netflix.

Channels on YouTube TV

Google has obtained deals with the five major TV networks in the U.S.: ABC, CBS, Fox, NBC, and The CW. About 40 cable channels owned by the parent companies of those networks are all onboard. This includes content from The Walt Disney Company, CBS Corporation, NBCUniversal, Brave, USA Network, Discovery, CNN, Cartoon Network, Fox Sports 1, BBC, ESPN and more.

Like traditional cable TV, it’s also possible to add additional premium channels. Some of these channels include AMC Premiere, Showtime, and NBA League Pass.

How to Gain Access to YouTube TV in Canada

YouTube TV has a variety of methods to verify if the user is based in the U.S. Therefore, to pass these checks and successfully get a YouTube TV account, you need to ensure their site can’t tell you’re based in Canada.

1. VPN Location Magic

First, you’ll need a VPN. By using a VPN, you can access the web with an IP address associated with a physical location in the U.S.

To do that, sign up with a VPN provider, and choose a plan. These services are very inexpensive these days. And typically, if you’re willing to commit to a plan for a year or more, you can save quite a bit.

Recommended VPNs are listed below. For more details, read full reviews of the top 3 VPN services here.
2. Get a U.S. PayPal Account

If you use a Canadian credit card, you’re rolling the dice. You may be able to rig YouTube TV’s payment system to accept it, but that doesn’t work with every credit card provider.

The most reliable method is to set up a U.S. PayPal account.

To ensure success, be sure to follow these tips:

  1. Before you do anything, enable your VPN. And make sure the service has assigned you with a U.S. IP address. This will give you access to the U.S. version of PayPal.
  2. Use a valid email that isn’t already associated with a PayPal account.
  3. When signing up, put in your real street address and credit card info, as you normally would.
  4. You’ll need to choose a zip code and find the U.S. city that is associated with it. The full process is below.

Your Canadian postal code needs to converted to a zip code. To do this, remove all the letters from it. For example, a postal code of M4B 1G7 is changed to 417. Next, to make it valid, add zeros to the end so it’s five digits. So, your new zip code should look something like this: 41700.

Keep in mind the zip code you got from the above process must be real for it to work. To verify if it’s valid, go to the USPS website and enter it. If it’s invalid, replace one of the zeros with a one. That should do the trick.

Finally, enter the U.S. city from the address found in the USPS link, along with your real street address. Now you should be able to complete the PayPal sign-up process.

3. Create a U.S. Gmail Account

This part is really simple!

  • Go to Gmail.com and click on the option to get a new account.
  • Make sure that you select the United States as your location.
  • Validate your account with your mobile phone number.

4. Change Your Location in Chrome

Although you’re now using a VPN to hide your location, Chrome can still spill the beans and reveal that you’re actually based on Canada.

The final step in hiding your whereabouts is editing the settings in Chrome’s location services.

Important: you’ll need to repeat these steps every time you launch your browser

  • Launch Google Chrome
  • Press ‘Ctrl,’ ‘Shift,’ ‘I’ to open Chrome’s backend framework on a PC. Mac users will want to hit ‘Command,’ ‘Option’ and ‘I.”
  • Click the icon made up of three little dots in the top corner of the new panel that just launched. Go to ‘More Tools,’ and then select ‘Sensors.’
  • You’ll now see an option called ‘Geolocation’ with a dropdown menu next to it. Select a location in the U.S. such as ‘San Francisco’ or ‘Mountain View.’
  • Great, now Chrome will think that you’re in the U.S.

5. Access Your YouTube TV Account

Whew, you’re nearly there. All you need to do is test that everything worked.

  • Go to the YouTube TV website.
  • Sign in with your U.S. Gmail account.
  • Choose to pay for the service with PayPal, then sign in the PayPal account you just created.
  • If all is good you should see a $1 charge and refund in your PayPal account (this is part of the validation process).

You Did It!

Congrats! You now have YouTube TV, just like the fortunate folks in the States.

As the process is pretty involved this guide is intended for PC and Mac users.

If you’re even more ambitious and tech savvy you can also get YouTube TV to work on Google Cast, Android, iOS, and Apple TV. To learn more about support for these platforms check out the guide on MobileSyrup (and scroll to the bottom of the article).

Why Brave Browser is Safe and Secure

Brave has been picking up a lot of steam lately.

The crypto community loves this browser. It’s being quickly adopted because Brave has cleverly integrated blockchain tech to create a totally new ad ecosystem. Both publishers and users are awarded with BAT (basic attention token). Also, underneath the hood its secret power is enhanced privacy.

For users of Chrome, this new browser isn’t much of a change in terms of use. Brave could be described as a privacy-hardened version of Chrome. After all, it’s built on top of Chromium, Google’s open source browser project.

So, Brave has killer privacy features (as explored in a previous article here). But is Brave Browser safe? Is it secure? Let’s jump into it!

Brave Browser Safety

Although not a household name like Google, Brave Software’s leadership has a history of achievement and trustworthiness.

Brave’s CEO Brendan Eich invented JavaScript, a programming language that is ubiquitous on the web. Also, he was a co-founder of Mozilla before moving on to Brave. So, Firefox, another popular and reputable browser is also associated with Eich.

It’s said that past behavior is the best predictor of future behavior.

Studies have proven that people trust their private data with Mozilla more than Google. This is expected as user privacy is a part of Mozilla’s core philosophy. Brave Software was born from the same ideals as Mozilla, so in time Brave browser is likely to gain at least the same high-level of trust.

Success and Trust Go Hand-in-Hand

Software won’t remain safe and secure without the dedication and talent of great developers. And clearly, it’s only possible to gain and hold on to talent when adoption of that software is healthy.

Before Brave came to the scene, those seeking an alternative to Chrome flocked to Firefox.

At its peak nearly half of all web users used Firefox. And it is still more popular than Edge, Safari or Opera according to browser use statistics. Due to the good track record of Firefox, Brave has a real shot at challenging Chrome’s dominance.

Rooted in Chromium

Rather than building a totally new browser and reinventing the wheel, Brave Software took an already great browser and made it their own. Brave is essentially Chromium with added features most people want built-in, and intrusions on privacy taken out.

Google built the codebase of Chromium initially, and as an open-source project, developers all over the globe continue to improve it.

There are two main factors that contribute to the safety of Brave.

First, Google is one of the best software companies in the world right now. That means the code was built from the ground up by top-notch developers. Second, due to the open-source nature of the project there are a lot of eyeballs on the code. This means security issues can be quickly spotted and patched by the community.

Brave Security

With a new update around every 42 days, Chrome is the industry leader in browser security. Inevitably every browser is judged against this gold standard.

And Brave isn’t far behind, which is impressive for a new, growing browser. A new version of Brave is released every 8 to 9 weeks.

The frequency of updates is about what you’d expect from Firefox. So, if you’re a Firefox user, you’ll feel right at home.

The Verdict

Although Brave is new and many still haven’t heard of it there’s no reason to shy away from using it.

As you likely came here questioning if Brave is safe, the fact Brave Software’s CEO was also the force behind Firefox should put your mind to rest.

Mozilla and now Brave Software provide an alternative to browser offerings by tech behemoths like as Microsoft, Apple and Google.

Those seeking the best privacy possible have a good reason to look beyond the obvious choices. Protecting your privacy and turning a profit are currently at odds with one another in the industry.

Download Brave browser here. To add to what you’ve learned, read more about Brave’s privacy benefits.

5 Hacks to Speed up Streaming

A lot more people are streaming movies today than a year or even a few months ago.

The mass migration from traditional formats to services like Netflix, Hulu, and Amazon Prime Video has brought us the gift of convenience but also technical hurdles.

As much as streaming is becoming the way to go, one can only enjoy the experience when they stream without pausing, re-buffering, and other interruptions. Thus, there are two major categories of persons that stream movies: those that enjoy the best speeds and those that struggle with getting decent speed when they stream. This article highlights hacks one can implement to move from the latter category to the former category.

Fix plugins: Current browsers are equipped with plugins for a wide array of different purposes. As much as certain plugins can guarantee a higher streaming speed, other plugins can be a drag when one streams. Here’s how to balance the good and bad effects of plugins.

Plugins still have a cost to performance when not in use. When a plugin is inactive but installed, it could affect the user’s streaming speed. Thus, it is important to uninstall all plugins that are not in use as they can negatively affect streaming speed.

Plugins are best when updated. Thus, to achieve high-speed streaming, it is essential to update plugins. Different bugs are typically fixed with the updated versions of plugins, and this ensures smooth streaming as well as less crashes and time-outs.

Clear caches and temporary files: When a person visits a web page, a lot of activities occur behind the scenes to enable the user to view that page. Such activities include the downloading of temporary files. These files are typically deleted by the browser when the web pages are closed before one exits the browser or shuts down the device in the case of a computer.

However, in some cases, one does not close the web pages properly before exiting the browser, and the files which would have been automatically deleted by the browser are stored. The buildup of these files reduces browser performance, which includes streaming tasks. Thus, to ensure the best streaming speed, one must delete temporary files and clear the browser history. That way, the browser activity is not unnecessarily reduced.

Switch from Wi-Fi to Ethernet: As much as Wi-Fi is the go-to Internet connection for streaming movies, slow or spotty Wi-Fi can cause streaming issues. With Wi-Fi, one makes wireless connections to their router, and this wireless connection does not offer as much speed as is available on the router to the user. When the wireless connection is swapped for a wired connection such as with Ethernet cable, a user gets the best speeds possible. Let’s say one uses a 10Mb/s router. With a wireless connection to that router, they may receive about 50% of that speed. A wired connection such as with Ethernet cables gives the user at least 70% of the speed of the router. So, all you may need to do is to switch Wi-Fi for Ethernet cables. Your device will get better speeds when you make that switch.

Turn off auto-update features: The different operating systems on devices, from Android to Windows, offer auto-update options. With this option enabled, newer versions of applications are downloaded as soon as they are available with special consent from the user. Thus, when the auto-update feature is turned on, apps could check for updates or update in the background when one engages in other activities such as streaming. This background activity can impair streaming performance.

To stream high-quality videos, it is thus advisable to turn off the auto-update feature. Alternatively, one can check for updates regularly and download updated versions of the apps at the most convenient time.

Reduce device load: This hack is somewhat applicable to other settings. The more individuals that share a resource, the lesser the quantity and quality of the resource each participant will get. Here’s how this “principle” is related to the quality of movies one streams. When many devices are connected to a router, the streaming speed reduces because of the device load. For faster streaming, it is advisable to reduce the device load on a router. So if you’re experiencing issues with streaming, make sure others in the home aren’t using the internet heavily at the same time.

Finally, everyone deserves to stream high-quality videos, and with these hacks, you’re sure to enjoy a better movie-watching experience.

Photo: PresidenciaRD

How to Hide Your IP on Nintendo Switch (with a VPN)

Switch is packed with great online features.

Challenge a buddy at Mario Kart 8 Deluxe with online play. Then use the Smartphone app to send him a playful message after running him off the road.

You can also download classic NES titles, or take advantage of cloud storage to protect your save data.

Not bad for $35 USD a year and light-years ahead of the online features included with Nintendo’s previous consoles: Wii and Wii U.

Top Two Ways to Hide your Identity

Sony’s PS4 and Xbox One allow users to hide their IP by adding a VPN in the console’s OS. Nintendo has no built-in features like this.

Luckily there are other methods to cloak your identity when connecting to Nintendo Switch Online. Simply use the VPN features built into your router or a Windows 10 machine.

First, Choose a VPN Service

A VPN (virtual private network) is needed to connect to the Internet anonymously with Nintendo Switch.

This means you’ll need to sign up to a VPN service to complement your Nintendo Switch Online subscription. Luckily VPNs that are both inexpensive and fast are easy to come by these days.

The top VPNs are reviewed here. Don’t pull the trigger until you compare them all to choose the best one for your needs.

Enabling a Switch VPN with Windows 10

Many will find they’re more comfortable with turning on the VPN for Switch via a PC rather than risking configuration woes by doing it with a router.

Note that your Windows box needs to be able to connect to the Internet wirelessly for this approach to work.

  1. Right click on the Start button. A contextual menu will appear. Select ‘Network Connections’ from this menu.
  2. On the left of the new window you’ll notice list of options below ‘Network & Internet.’ Click on VPN.
  3. Make sure you have signed up with a VPN service and have the login credentials needed to connect to it.
  4. Click on the option to ‘Add a VPN connection’ with a large plus sign next to it.
  5. Complete the form with the info provided to you by your VPN service provider. Click the ‘Save’ button.
  6. If your PC has wireless capability you’ll see a ‘Mobile Hotspot’ option at the left of the window. Change the login info and turn it on. If you’re experiencing any issues, try restarting your machine then opening and closing it until it functions correctly.
  7. Click on ‘Ethernet’ then click ‘Change adapter options’ listed under ‘Related settings.
  8. Right click on the VPN connection you created earlier, then click on ‘Properties.’
  9. Click on the ‘Sharing’ tab. Check the box that states “Allow Other Network Users to Connect…” In the dropdown box for network connections select the desired Wi-Fi hotspot (It might be Local Area Connection* #).

Congrats! You’re ready to use your Nintendo Switch online with your IP address hidden.

Users have also successfully connected their Switch to a VPN via a PC with a wired connection, as well as an Android phone. The instructions are cloudy but you can read more in the replies to this post on Reddit.

Enabling a Switch VPN with your Router

Turning on a VPN service with your router is also a great option, especially if you’re a technically adept user.

The precise steps in configuring the router’s software vary depending on the manufacturer. In essence you need to find the correct place to enter your VPN address, username and password so your hardware can route the Internet connection through the VPN.

Every good VPN provider has a knowledge base on their website that steps you through the process of configuring a wide variety of routers to use their service. It’s recommended that you check this first for the most up-to-date instructions.

Here are links to the support pages associated with some of the best VPN services:

Majora’s Mask

Although Nintendo doesn’t officially provide an interface to utilize a VPN, it’s fairly easy to set up anyhow. It’s basically the same process as hiding the IP on a PC.

This guide should provide everything you need to anonymously dominate at Splatoon 2, ARMS, Mario Kart 8 Deluxe and other multiplayer titles.

How to Hide Your IP Address in Vuze

The BitTorrent application once known as Azureus continues to be a popular choice as many are attracted by its slick interface and wealth of features.

Follow the directions below to hide your real IP from other BitTorrent users as well as companies that use advanced tracking software to spy on users who download certain torrents.

Step 1

From the top menu go to Tools > Options

Step 2

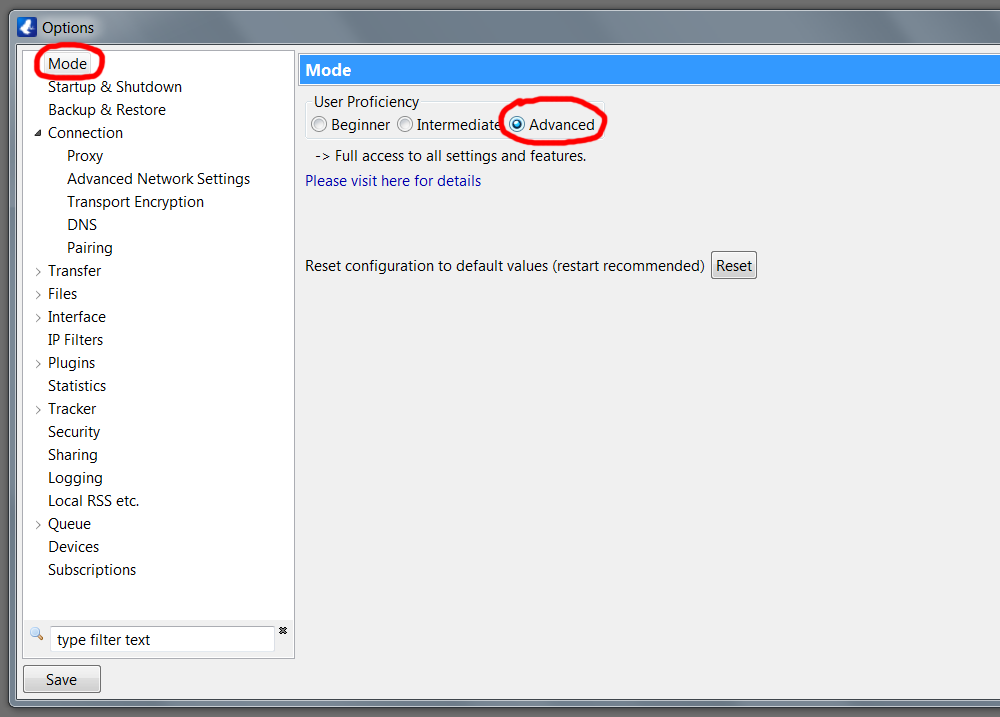
Make sure “Mode” is selected at the left pane inside the Options window.

Under “User Proficiency” click on the radio button marked “Advanced.” This will give you access to proxy options not available when the lower levels of user proficiency are enabled.

vuze-proxy1

Step 3

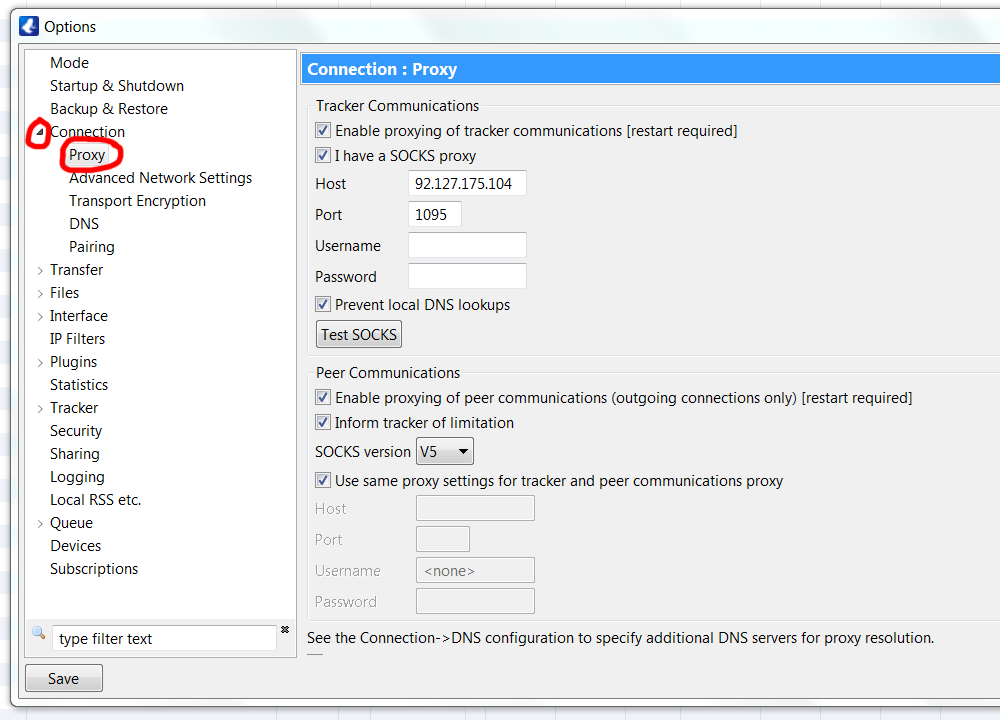
Click on the small arrow next to “Connection” in the left pane. This item will expand to reveal subsections. Click on “Proxy” (listed under “Connection”).

vuze-proxy2

In the main part of the window under the label “Tracker Communications” click on the checkbox next to “Enable proxying of tracker communications (restart required).”

Further below under “Peer Communications” click on the checkbox next to “Enable proxying of peer communications (outgoing connections only) (restart required).”

Don’t restart yet; do that later after you’ve entered the required values in the Proxy window.

Step 4

To continue with this step you’ll need to determine which proxy host you’d like to use.

For testing purposes I used a SOCKS v5 host I found on socks-proxy.net, and while this is adequate for very small files the speeds are much slower than paid services.

If you plan on hiding your IP in Vuze on a regular basis and are interested in larger files like most people (movies, music, software), you’ll need to sign up with a VPN service.

Recommended services:

Enter the information provided by a site that lists proxy host IPs (and ports). As a sample to give you a good idea of what you need to enter, I’ve entered the required fields using a publicly available host from Russia in the screenshot.

vuze-proxy2

Most users will want to want to “use the same proxy settings for tracker and peer communications proxy”, so make sure this is checked under “Peer Communications.”

After you’d entered the required info remember to click on the “Save” button in the lower left of the window.

Step 5

Now you can safely restart the software.

Go to File > Restart Vuze (just above Exit).

All Done

That’s it! You’re now ready to start downloading. Load in a torrent and see what kind of speeds you’re able to get.