How to Stop Throttling by Your ISP (Verizon, Comcast, AT&T, Time Warner, etc.)

snail-speedIn February Ars Technica reported that video streaming performance had been dropping dramatically for the past three to four months on Verizon and Comcast.

Since Netflix, YouTube and Hulu are notorious for sucking up bandwidth, ISPs are getting more aggressive with throttling video streaming. Actions that were taken to slow down peer-to-peer file sharing via bittorrent are now being taken on video sites and services.

The only ISP that had improved video streaming speeds during this stretch of time was Google Fiber. The other major ISPs have revealed their lacking infrastructure and stingy nature once again, and it’s unlikely the trend will reverse itself anytime soon.

The best analogy is that of a traffic jam. Too many users want high quality video in the same locations, causing congestion and therefore slower speeds.

So if you want video streaming without pauses and munching on popcorn while waiting for the buffer bar to grow at a snail’s pace, you’ll need to think differently than your neighbors.

The VPN Solution

Luckily there is a way around the issue by using a virtual private network (VPN).

Ars Technica did a follow-up piece explaining how VPNs can allow savvy users to find better roads to travel on:

[…] a VPN may route your traffic away from congested servers and links that would normally serve up video to your home. Netflix and YouTube store video caches in many locations, and data can take multiple paths to its final destination.

“Imagine you’re in the US and that you are on a carrier that existed in multiple states and time zones, you can VPN to the West Coast from the East Coast and end up getting the idle servers that are there, just sitting and waiting for people to get out of school and off work and so on,” Bowman said.

So now you know why a VPN works, let’s look at what you’ll need to consider when choosing a VPN, shall we?

Using a VPN for this purpose is the taking a toll road. It’s the best route, free of annoying congestion, but you also need to pay to play.

Due to the demanding requirements of video streaming not just any VPN will do, or more specifically any free solution will inevitably lead to frustrating, slow performance, defeating the purpose of using a VPN in the first place.

Currently my three favorite high-performance VPNs for video streaming are the following:

At $10 or less per month, it’s well worth it if you rely on Netflix, YouTube, Hulu and other streaming services as main sources of entertainment. It sure beats paying for cable TV.


Photo: Rovanato

How to Unblock U.S. Only Videos (YouTube, Hulu, MTV, South Park, etc.)

Being denied access to a video merely due to living outside the U.S. may be one the most annoying problems to plague the web.

sorry-canada

Luckily there are a variety of browser plugins, software and services you can use to overcome the barrier.

The catch is that the free options aren’t always quick enough to stream high quality video without hiccups. Virtual private network (VPN) services that ensure flawless video playback consistently aren’t free. A VPN may or may not be worth it depending on how much U.S. only sites and content you crave.

Plugins

If you just plan to watch the occasional U.S. only video and aren’t picky about performance, start with a browser plugin. Just keep in mind you’ll be entering captcha codes to prove you’re human on sites like YouTube, which can get tiresome, because the proxy server IPs are overused.

There are two popular plugins to consider: ProxTube and ProxMate. They work with Chrome and Firefox. These work by hiding your true IP and replacing it with an IP associated with the country the video is allowed in.

VPNs

If you’re planning on watching a fair bit of video on YouTube or Hulu and want the best user experience free of technical issues and shoddy streaming, VPNs are the way to go.

With a VPN you download desktop software, which manages connecting to proxy servers available with the plan you go with.

Generally I recommend these three VPN services:

VyperVPN is super quick and the best overall VPN. The monthly rate is a good value, but you won’t save as much as the others if you pay annually. A three-day free trial is offered so you can test drive the service before committing to a plan. Read my full VyperVPN review here.

PureVPN and StrongVPN get the job done just fine and are dirt cheap if you pay annually ($50 or $55 per year).

Closing Remarks

Hopefully content providers will get more lax about restricting video from being viewed outside the U.S. as time moves ahead. Some of these copyright laws strike me as antiquated and arbitrary. Until then enjoy all the video you can handle with the use of a handy plugin or VPN.

VyprVPN by Golden Frog VPN Review

Looking for a slick, easy way to hide your IP without sacrificing speed? Golden Frog’s VyprVPN may be what you’ve been seeking.

Software

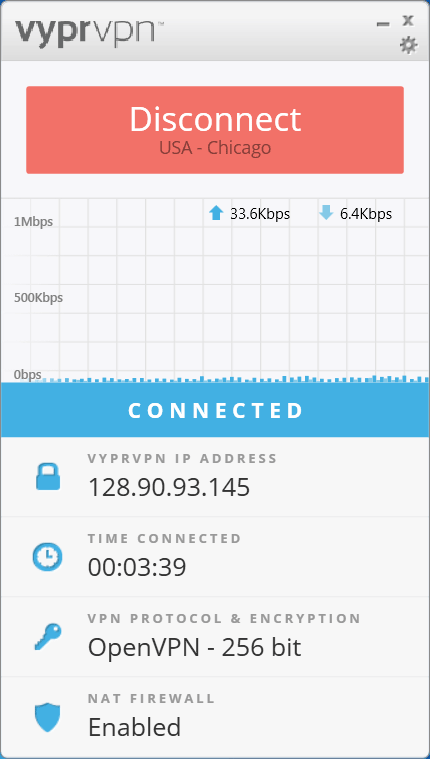
vyprvpn-chicagoVyprVPN is available for Windows, Mac, iOS and Android. This review focuses on the Windows version and was tested using their Premier plan.

The Microsoft .NET 4.5 portion of the VyprVPN installer package stalled on me, but after getting through this small hiccup any initial doubts I had were eliminated.

VyprVPN desktop software is wonderfully designed, intuitive to use, and it just works. It appears in a tall, thin window, like a desktop widget, freeing most of your screen real estate for Web browsing.

Click the big “connect” button and you’ll be connected to the closest server available without any hassle. Every time you do, you are given a new IP to hide your true IP address.

Props to Golden Frog for keeping things simple for the average user by making the most used basic functions prominent. Connection speed bar graph, VyprVPN IP address, time connected, protocol and encryption details, NAT firewall, etc. are cleanly displayed.

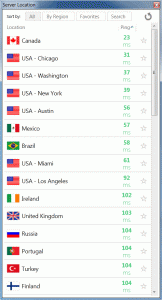
server-locationsUnder the hood it offers a great level of settings under the options menu reserved for power users. One notable aspect is the encryption options, which include Chameleon (256 bit), OpenVPN (256 bit or 160 bit), L2TP/IPsec (256 bit) and PPTP (128 bit).

Chameleon encryption is unique to VyprVPN and works by masking VPN traffic so the connection isn’t blocked or throttled.

Speed

Naturally the closer the VPN speed is to that of your vanilla internet connection, the better the VPN’s performance.

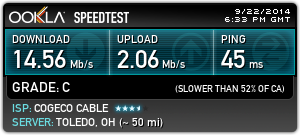
To start I tested my ISP speed (cable broadband) in order to compare the results to the performance while connected to VyprVPN servers.

Base ISP speed results:

no-vpn

VyprVPN automatically makes the default server the one with the fastest ping time. If you want to assume an IP associated with a specific country or U.S. state, you can choose from a list of 45 major markets around the world.

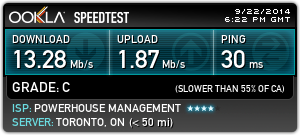
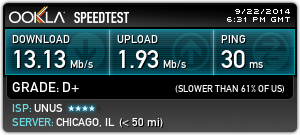
The two closest servers to me are Toronto and Chicago.

Toronto server, VPN results:

toronto-server

Chicago server, VPN results:

chicago-server

Speeds were so close to my connection without a VPN I couldn’t tell the difference. Big files were downloaded with ease and HD video streamed without hiccups.

VyprVPN would be a good choice indeed for people outside of the U.S. that want access to the U.S. version of Netflix, which is one of the most demanding uses of a VPN.

Price

VyprVPN has a competitive monthly fee, especially when you consider the high quality of the service. Three plans are offered depending on your needs. The main difference is the number of simultaneous connections they allow. With basic you get one connection, with pro you get two, and premier allows three.

vyprvpn-plans

  • Basic: $6.67/month annually or $9.99 monthly
  • Pro: $8.33/month annually or $14.99 monthly
  • Premier: $10.00/month annually or $19.99 monthly

Learn more about the plans here on Golden Frog’s official site.

Conclusion

VyprVPN is polished, easy to use and the performance is top notch. I’m docking a bit off the score for the installation woes but keep in mind this could be the fault of Microsoft and not Golden Frog.

Highly recommended!

4.5/5

Click here to get VyprVPN software or learn more!

How to Hide Your IP Address in uTorrent

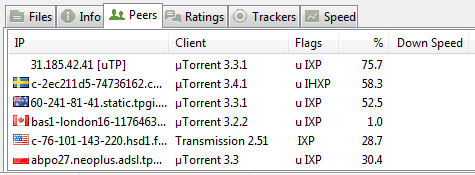
Peer-to-peer file sharing users are becoming increasingly concerned about exposing their IP publicly. As you’re aware, uTorrent shows connected IPs under the “Peers” tab.

utorrent-1

More concerning is the ability of film studios for example to plant tracking technology embedded right into the video. This allows them to issue copyright infringement notices through ISPs. I’m not encouraging piracy, merely noting that your IP can be harvested and possibly used against you when you share or download torrents.

The idea behind this tutorial is to replace your real IP with the IP associated with a VPN service.

Step 1

For testing purposes I used JustFreeVPN. Please note that free VPNs are excruciatingly slow especially when downloading huge files via torrent.

I strongly recommend that you sign up with one of the reputable, fast VPN providers below to avoid frustration. Plans are typically $10/month or less.

Recommended services:

Step 2

From the top menu go to Options > Preferences (Windows) or uTorrent > Preferences (Mac).

Step 3

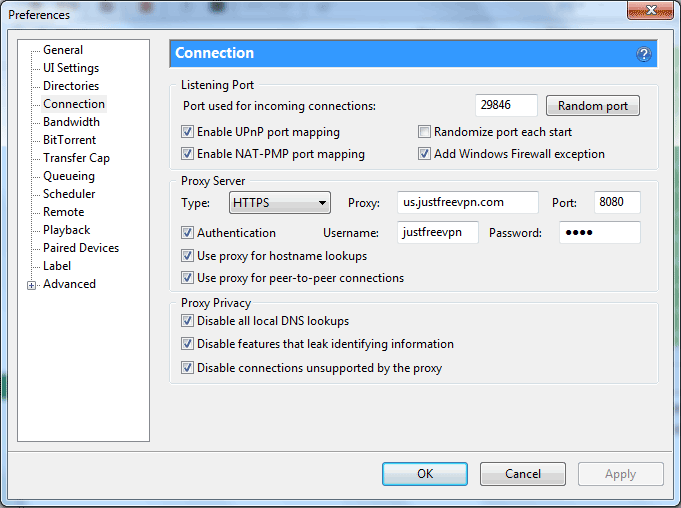
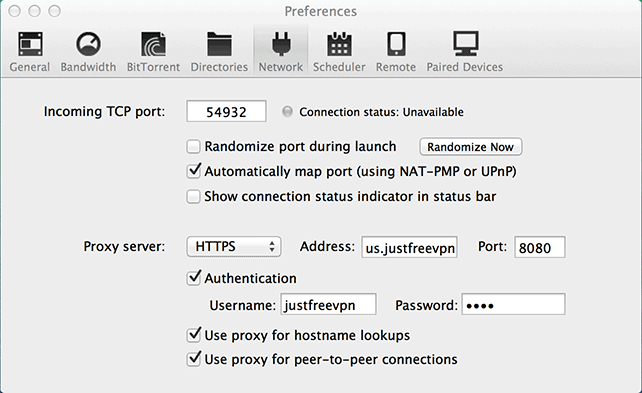
A new window will pop up. Click on “Connection” on the left (Windows) or on the “Network” icon (Mac).

Step 4

Select the proxy server type from the dropdown button as specified by your VPN provider. Check the box next to “Authentication” and enter the username and password you were given.

Windows

There are a number of advanced options here under “Proxy Server” and “Proxy Privacy.” For maximum protection check all the boxes as shown in the screenshot.

Click the “Apply” button.

utorrent-2

Mac OS X

Check the boxes under your login info as shown in the screenshot for maximum protection.

utorrent-mac-1

All Done

Congrats! Your real IP will no longer be displayed in uTorrrent.

How to Hide Your IP Address in Windows 7 and Vista

Surfers seek to hide their IP for a number of reasons. Often it is done to view sites that have been blocked by an administrator at school or work. No matter the reason, it’s easy to accomplish once you know the basic steps to follow.

It would be impossible to browse online without any IP address at all, because that is how web pages can route your requests. Hiding your IP address is actually a process of changing your ISP-issued IP to a new one, in effect “hiding” your old IP.

Although there is a wide variety of ways to hide your IP in different applications such as web browsers, here we’ll be looking at changing the system settings in Windows 7 or Vista to achieve the desired effect.

Note: It’s not recommended to use this method often, as your ISP may have a policy preventing frequent renewal of IPs. If you need to change your IP often, use a proxy server instead by following one of the tutorials below.

Step 1: If you have a router

Turn your router AND modem OFF.

Disconnect the Ethernet cables from your router.

Plug the cable from your modem directly into your computer.

Restart both the computer and modem.

Wait for your Internet connection to become active again.

Launch a web browser to confirm that your internet connection is working.

If you run into any difficulties, restart your modem and computer again. First, disable your Local Area Connection (LAN). Then, enable the LAN connection. Most likely that will bring your connection back.

Step 2: Confirm your current IP address

Visit CheckIP.org to see your current IP address (for comparison purposes later). Paste the IP into Notepad or write it down.

Step 3: Launch Command Prompt

Click the START menu, then type “cmd” in the white search box (don’t include the quotes) and hit Enter.

Step 4: Release the current IP

When the window pops up and prompt appears, type “ipconfig /release” (with a space before the slash) and hit Enter.

Step 5: Reset your modem

Turn your modem OFF and wait 30-45 seconds before switching it back ON.

Wait another 30-45 seconds after restarting the modem. Watch as the LED lights light up.

Step 6: Reset your connection

Go back to your START Menu then click on “Control Panel.”

Click “Network and Internet”, then “Network and Sharing Center” (click the big green text, not the blue links)

In the left-side pane, click the link for “Manage network connections”

Select your “Local Area Connection”, Right-click it, and choose “Disable”.

Wait 10-15 seconds.

Once more, right-click on “Local Area Connection,” and this time select “Enable”.

Wait 30-60 seconds. This is an IMPORTANT step. Do not try to proceed before giving it some time to work.

Step 7: Confirm the changes

Go to CheckIP.org to see your current IP address. Compare the original IP you either pasted into Notepad or wrote down to the IP in your web browser.

Nice work! You have successfully hidden your IP address in Windows 7 or Vista!

It’s recommended that you run CCleaner to clear the cookies from your computer. Otherwise your efforts to shake off trackers will most likely be wasted.